Friday, July 29, 2011
Lack of new Posts
well, I haven't posted in a Long time, and I do sincerely apologize for that. I haven't posted for a couple of reasons, the first being, well, I kinda forgot about this blog, sorry. the second reason being, well no one seemed to read this blog, so I stopped posting. BUT I decided, that Isn't going to stop me! I will continue to make posts because, well, I kinda enjoy this, so within a couple days, expect a bunch of pictures and small rant regarding my Recent birthday and future events! See my (2) readers next time!
Saturday, February 19, 2011
MG Gundam RX-78-2 Ver. 2 Review
OK, Finally, I got around to getting this done. I will apologize in advance if the picture quality isn't that great, I am working on it. This will be my first review as well, so I would appreciate some constructive criticism for later reviews. Now without further Delay, I present the Original Gundam, in Master Grade form.


 Here is a Picture of all the included Accessories that Come with the Gundam not shown are Decal sheets, and the sticker sheet, as i threw them away when I was done applying them. I applied all of the Dry transfer Decals. as for a list of Accessories:stand for Core Fighter(will be showcased later in this review), Gundam Hammer(ball and chain", Hyper Bazooka, Shield, Beam Saber handles x2, Beam Saber Blades x2, Beam Rifle, Attachable Super Napalm, Beam Javelin, Action Base attachment, and a 1/100 scale figure of Amuro Ray,

 Here is one of very few poses you can pull off with my least used weapons in his Arsenal, the Gundam Hammer, it is a Ball and chain, with a peg in the hook end to carry it.There are two master links at each end, while the rest of the chain is pre-connected.I had some difficulty attaching the master links to the weapon ends, so Please be careful while doing so.
 Now Arming up the Gundam with is basic Armament, the beam Sabers attach easily to the backpack via small pegs, which in turn attach to the backpack through small ball-joints allowing for a bit of movement with the saber handles.The Super Napalm attachment makes you take the beam rifle off, attach a clip to the barrel, then slide it back to the main body. Considering it was used once, in episode 2, it was quite nice of bandai to include it, even though I never pose with it. the beam rifle itself attaches through the aforementioned Peg system, with one finger wrapping nicely around the trigger. The shield attaches with with a small peg that plugs into the back of the arm the peg also have a swivel joint at its base, letting you spin the shield on the arm, then the gundam can grasp a handle that is on a hinge joint for a more secure grip.

 Now onto the unseen accessory, the Core Fighter. It becomes accessible by removing the top half of the suit, which is held rather securely through a few pegs attaching to the lower half. the core fighter is held in by a couple of holes where its thrusters are, which plug into pegs on a plate that swivels giving you waist motion while not sacrificing much structural integrity, there is even a couple joints in the torso, so it can move forward and backward, and side to side, at least, a little.
 Once the core fighter is out, you can reassemble the gundam, it loses some structure but it still stays together decently enough. the core fighter looks like this will transformed.
 First we have to flip on the nose, and pull it out, revealing a small Amuro Ray pilot, whose seat pivots when transformed. It is quite the neat little feature.
 Form there, you just fold out the wings, and you are done. The wings can Extend, but the connection is very flimsy so I tend not to do it anymore. on the top of the core fighter are two small panels that can be flipped up to reveal missiles, though I suggest using a toothpick to open them.
 The Core Fighter itself is quite Detailed, as it has small notches near its nose where its machine guns normally were, and includes the missile hatch, combine that with its transformation gimmick and we have a very nice Core Fighter that looks Great when set near the Gundam. Next we will look at the kits Posing Options.


 Now for an important picture, a size comparison. As shown, it is about the size of Pepsi bottle, so it doesn't take up much shelf space, but still looks quite nice on a shelf in whatever pose you decide.
 For closing Comments, the Gundam would like to personally wave goodbye to our readers. You are probably thinking, is it worth it, can I suggest this kit? and at around a $40 price tag, I would have to say this Kit is entirely worth it. this does follow a more cartoony anime accurate version of the Gundam, so if you prefer a more realistic Gundam I would suggest the Real Grade 1/144 or the One year War Version. However, I will suggest this to any Gundam fan, or just fan of Model kits in general. It is a Great kit, has Excellent posing options, and comes with every accessory you would need. Thank you for taking the time out to read this, and I hope to make many more soon!

Front view with no Hand Carried weapons. The Kit is Not painted, the only things I did to it were sand down the "nubs" of plastic left over, and apply some decals. The colors are nice and Vibrant, with the blue being a Nice light blue. Other colors include a Dark Gray for the frame Yellow, Red, white, and clear plastic in some parts.

Side View

Back View


here is Close of the Beam rifle and Bazooka, showing the pegs that allow them to attach to back skirt, as well as the small slots that connect to a small peg on the palm of the hand, for a more secure connection.


The shield also has a small panel that slides up to cover the eye hole, a nice touch, even if not entirely necessary.


This is a nice Example of how far the joints at the knee, and elbow can bend. the Foot also has a nice range of motion, with a "toe" in the very front giving you a bit more surface area in precarious poses.

This is a Nice pose that some fans may regonize from the series...'cept in the series he is space. ANYWAY, there is a good reason I chose to display this pose here *points below*

To show you all this very nice shoulder joint system it has. it has the normal peg into the arm, then a second one that moves up and down. on top of that is has one inside the body that swivels side to side, with a small piston attached to that, creating a.....quadruple joint? In any case, it is an excellent joint system that allows for a HUGE range of motion in the shoulder.

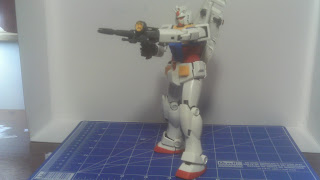
Your basic Two hand beam rifle shot.

A more Dyamic Pose with the Same armament

Down the barrel but the same pose from before.

The Oh-so-famous "last shot" that the gundam took on New years eve.

One of the most Dynamic Poses you can pull of with this kit, you can get a bit fancier, but mine has been played with a bit, so a couple of the joints have worn out, due to this being virtually Poly-cap(rubber joints often used in Gundam kits)-less kit.

Showing Just how High he can kick, which is quite high, while maintaining balance.

And finally a look at the Extensive inner Frame that makes up the suits interior. On the Elbow and Knee joints there are a couple of sliding joints to simulate pistons, and even under the shoulder plats and skirt armor there is inner frame. It is possible to pose the kit with virtually NO armor on, just be sure to not put the body armor on, as it is quite difficult to remove once it is on.


Saturday, January 29, 2011
Camera
it has come to my attention, that before I can post proper reviews, I will need to either A Figure out how to take decent pictures with my current Camera, or B Get a better camera, I apologize for this.
Thursday, January 27, 2011
1st Post
Well now I have my own blog, My real Name is Tyler, Some People know me as Wardog, some as Biofreak2. On this blog, I'll do reviews of the various things I like and have. I'll also rant every once in a while when something greatly annoys me, or I really like something.Well, as the Name suggests I am an Otaku, but I also Enjoy Nerfing, As well as a Good Video game once in a while
Subscribe to:
Posts (Atom)